Installing SPC flooring is a relatively simple project. The planks are designed to interlock without glue or nails and can be trimmed easily with a utility knife. This article outlines the steps involved in laying SPC flooring. Haven’t decided which flooring to get yet? Read our article on how to choose the right SPC flooring.
Calculate square footage
The first thing to determine is how many boxes of planks you’ll need. To do this, you need to calculate your square footage. Measure the length and width of the space, then multiply the length by the width to get the square footage. Be sure to include any closets and hallways in your calculation. You will also need to subtract any area that won’t need to be covered, such as a kitchen island.
Once you have your square footage, add 5% to 10% to allow for any loss of material due to mistakes, defects or extra cuts. Adjust this percentage based on your level of experience and the complexity of the project.
Get the right tools for the job
Below are the tools and materials you’ll need to install your SPC flooring. Make sure you have them before you start!
| Tools | Materials |
|
Rubber mallet Pull bar Metal ruler Miter saw or table saw to cut mouldings Finishing nailer to install mouldings Oscillating tool, if you need to shorten door frames |
Vapour barrier (if needed) Vapour barrier sheathing tape (if needed) Finishing/transition mouldings
|
Make sure you’re installing your SPC flooring on the correct surface
SPC flooring can be installed on almost any surface, including concrete, plywood and tiles, but not carpet. Check that the surface is solid, smooth, level, clean and dry before starting the installation. Refer to the manufacturer’s instructions for more details.
Pro tip: All SPC flooring sold by BMR includes a soundproofing layer. However, we recommend adding a vapour barrier if you are installing your SPC on concrete, in a basement, or anywhere with high humidity.
Step 1: Preparation
Place the SPC planks in the room where they will be installed and allow them to acclimate to the room’s temperature and humidity for 24 hours. Don’t stack more than three boxes on top of each other. Materials expand and contract in response to ambient conditions, so this will help prevent the plank fastening system from warping and gaps from appearing between the planks after installation. Ideally, the humidity should be 40% to 60% with an ambient temperature of 18 °C to 25 °C. Always refer to the instruction manual included in the box before you install your flooring.
- Remove doors and mouldings, if necessary.
- Remove existing flooring, if necessary.
- Shorten door frames, if necessary. Place a plank at frame level and trace a line on the door frame just above the floor. Use a handsaw or oscillating tool to cut below the line.
- Prepare the surface: make sure it is level, dry, smooth and clean.
- Install the vapour barrier, if necessary.
- Plan your layout: Trace a guideline for the first row of planks. Use spacers to leave a ¼ inch gap between the first row and the wall. This gives the planks room to expand (your mouldings will hide the gap). Check the manufacturer’s instructions, as the ideal gap size may vary depending on your flooring.
- It’s a good idea to mix planks from different boxes as you go, because the colour and pattern may vary slightly. Mixing between boxes will make these variations less noticeable once all the flooring is installed.
Pro tip: Before installing your flooring, measure the depth of the room to make sure the last row of planks will be at least 2 inches wide. If not, we recommend making your first row narrower so that the last row can be wider. The minimum width may vary depending on the manufacturer.
Step 2: Installation
- Start on the left-hand side of the space, ideally along the longest wall. Lay down your first plank with the tongue side facing the wall. Remember to leave a ¼ inch expansion gap between the wall and the planks (on both the short and long sides).
- Install the next plank, making sure that the short side of the second plank is properly interlocked with the first. If needed, tap lightly with a rubber mallet to secure it in place.
- Install the rest of the row. Use spacers to maintain a ¼ inch expansion gap.
- Cut the last plank in the row to size (leaving a ¼ inch expansion gap at the end). For aesthetic reasons, the last plank in the row should be at least 8 inches long. If not, cut the first board in the row a few inches shorter and move the whole row to the left so that the last plank can be at least 8 inches. Don’t cut the first plank shorter than 8 inches either.
- Use the rest of the last plank to start the next row. Hold the long side of the plank at a 45 degree angle and interlock it firmly with the first plank in the first row. For aesthetic reasons, make sure that the joints on the short side of the boards are staggered by at least 8 inches from one row to the next.
- Repeat until you have laid all your planks. Remember to leave a ¼ inch expansion gap between the last row and the wall. If needed, you can use a pull bar to make sure the last row is firmly locked into the previous one.
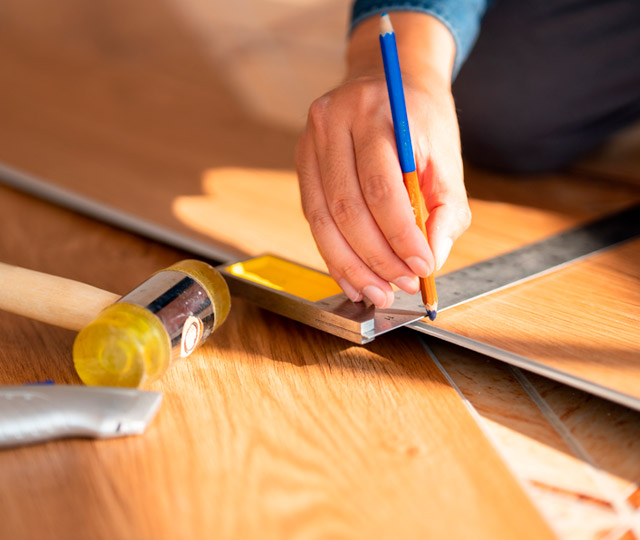
Pro tip: To cut a plank to size, score it as deeply as possible with a utility knife and a metal ruler, then simply break the board along your scored line.
Step 3: Finishing
- Remove the spacers.
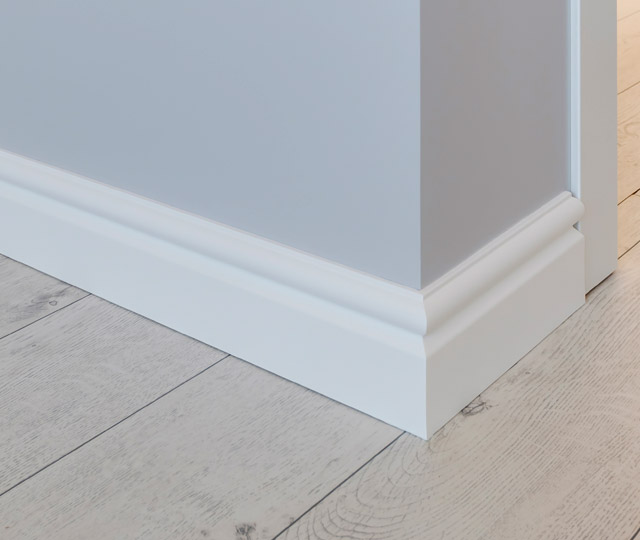
- Install or reinstall your mouldings, taking care not to nail them into the flooring.
- Install transition mouldings (T-mouldings) if you need to cover up the edge of the flooring between rooms or along door frames.
Ready to choose your SPC flooring? Browse our options online or visit your local BMR for more advice.
En savoir plus sur le plancher stratifié
Installer son plancher flottant en vidéo
Notre expert BMR vous montre, étape par étape, comment procéder à l'installation de votre nouveau plancher flottant.
Choisir son plancher stratifié
Parcourez notre guide d'achat pour tout savoir sur le plancher flottant et faire le bon choix.
Entretenir son plancher stratifié
Découvrez nos conseils d'entretien pour prolonger la durée de vie de votre parquet stratifié.
Shop by category
The information in this article is intended as a guide only and may not be applicable in certain situations. When in doubt, contact a local BMR expert.