Ceramic tiles require a little more skill to install than other types of flooring. But with the right preparation and some basic knowledge, it is definitely doable. In this article, we’ll go through the steps for installing a ceramic tile floor. But first, you’ll need to know what type of tiles you’re using. Read our other article to help you choose the right tiles for your project.
Calculate the square footage
The first thing you need to know is how many tiles to buy. For that, you’ll need to measure the square footage of the floor you want to cover. Once you have your square footage, add 10% to 15% to account for loss due to error, defects or additional cutting. Adjust this percentage based on your level of experience and the complexity of the project.
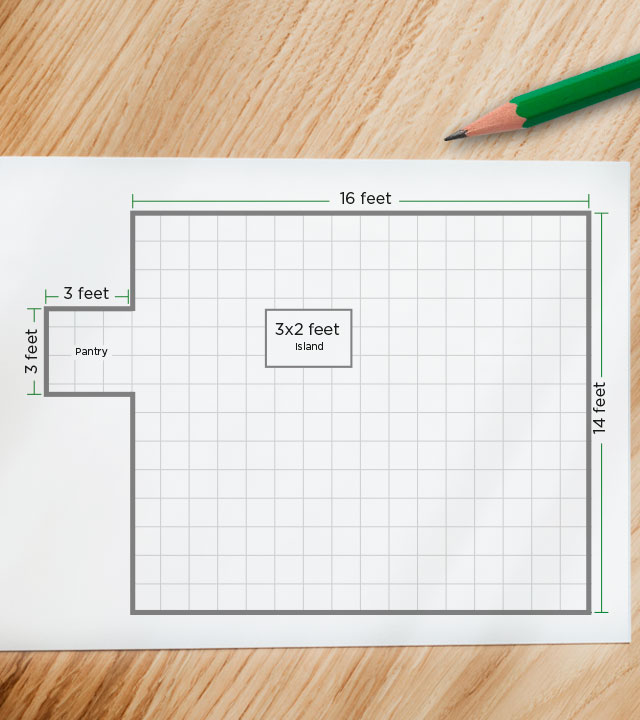
For example, let’s say you’re tiling your kitchen floor:
- The total surface area of the room is 16 ft. x 14 ft. = 224 sq. ft.
- Add the surface area of the pantry, which is 3 ft. x 3 ft. = 9 sq. ft.
- Subtract the surface area of the island, since it is fixed to the floor: 3 ft. x 2 ft. = 6 sq. ft.
- The total area to be covered is therefore 224 + 9 − 6 = 227 sq. ft.
- Add your margin of error (let’s say 10%) = 22.7 sq. ft.
- This means that your tiles should add up to 227 + 22.7 = 249.7 sq. ft.
- Product specifications often indicate how much surface area each box will cover. For example, if one box covers 13.56 sq. ft., then your project requires 249.7 / 13.56 = 18.41 boxes. Rounding up, you know you need to buy 19 boxes.

Get the right tools for the job
Here are the main tools and materials you’ll need to install your ceramic tile floor. Remember, you may need different tools and materials depending on the specific tiles you’re using. When in doubt, ask an in store expert.
| Outils | Matériaux |
|
Utility knife (to cut the uncoupling membrane, if needed) Rubber mallet Leveling spacer wedges and leveling supports (if needed) Tape measure or metal ruler Drill/driver (to screw down the subfloor and mix the grout) Finishing nailer (to install mouldings) Oscillating tool (to shorten door frames, if needed) |
Uncoupling membrane (if needed) Wooden block Grout sealer (if needed)
|
Make sure you are installing your tiles on the correct surface
Ceramic tiles can be installed on a plywood subfloor or concrete surface. If you have a plywood subfloor, it should ideally have a base of 5/8-in. planks screwed to the house’s joists with a top layer of 3/8-in. planks to reinforce the structure.
If your floor creaks underfoot, it’s likely that the base plywood is not firmly anchored to the joists. You need to tighten the screws! If you’ll be installing on a concrete surface, make sure the concrete has not been painted or sealed, as this may stop the mortar from adhering to the floor.
Either way, make sure your surface is solid, flat and level, otherwise you run the risk of getting cracks in your tiles over time.
Uncoupling membrane
You can install an uncoupling membrane between your subfloor and your tiling. Uncoupling membranes help to prevent any movement between these two layers. This in turn keeps your tiles from cracking.
Step 1: Surface preparation
- Remove any mouldings and doors that are in the way.
- Remove any existing tiles.
- Prepare the surface: Make sure your tiling surface is solid, level, dry, smooth and clean. You may need to use a sander for this. If the old tiles were adhered directly to the subfloor, it may need to be replaced.
- Shorten door frames as needed.
- Check your tile layout: Mark reference lines to help you remember your planned layout. Line up one or two rows of tiles on the floor (without adhering them) and insert spacers in the joints. We recommend starting in the centre of the space so that the tiles at both ends of the row will be cut to the same size. Do this for both a vertical and a horizontal row. Then, use a level and a chalk line to mark your guidelines.


Step 2: Tile installation
- Mix the mortar according to the manufacturer’s instructions. To prevent waste, don’t mix too much product at once.
- Spread the mortar with the flat side of your trowel at about a 45-degree angle.
- Then, use the notched side of the trowel to create ridges in the mortar.
- Place two or three tiles along your guidelines.
- Insert spacers in each joint. If you are installing rectified tiles, use levelling spacer wedges to ensure that the tiles are aligned at the correct height.
- Wipe the excess mortar off the tiles with a slightly damp sponge.
- Lay a piece of wood over the tiles and tap lightly on it with a rubber mallet to firmly embed the tiles in the mortar.
- Repeat steps 2 to 7 over the entire floor.
- As you work, use your level to check that everything is straight, adjusting if needed.
- Depending on the size of the room, you can lay tiles in sections, or simply start at the back of the room and work toward the door. Be careful not to step on your freshly laid tiles.
- When you reach the wall, calculate how big the tiles in the last row will need to be, then cut them with a tile cutter. You can wait 24 hours and install these tiles separately. Leave a 1/4-in. expansion joint along the walls. This space will be filled with grout and hidden by moulding.
- After 24 hours, remove the tile spacers and apply grout.
Pro tip: Not sure if you’ve used enough mortar? After laying the first tile, wiggle it gently from side to side and push it down lightly. Then, lift it back up and make sure the entire back surface is covered in mortar. If there are any gaps, you need to use more.
Step 3: Finishing
- Make sure your surface is clean and free of any debris that might stick to the grout.
- Use a drill and grout mixer to mix your grout according to the manufacturer’s instructions.
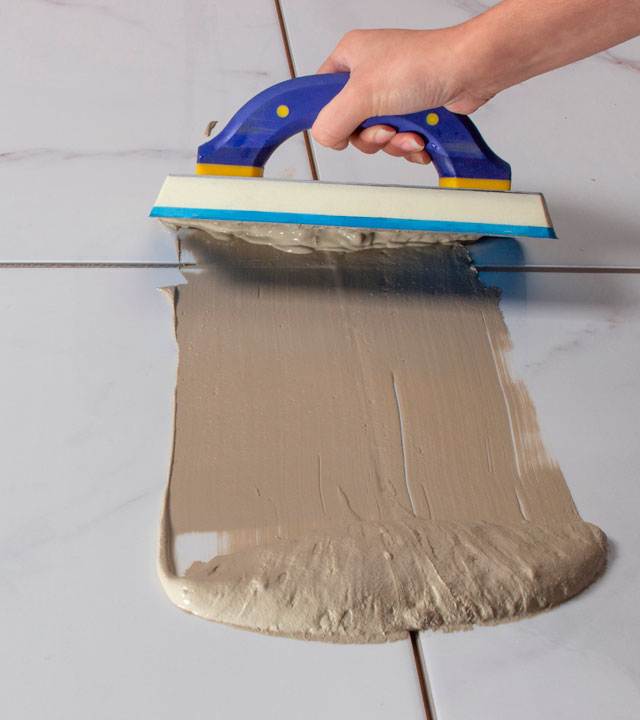
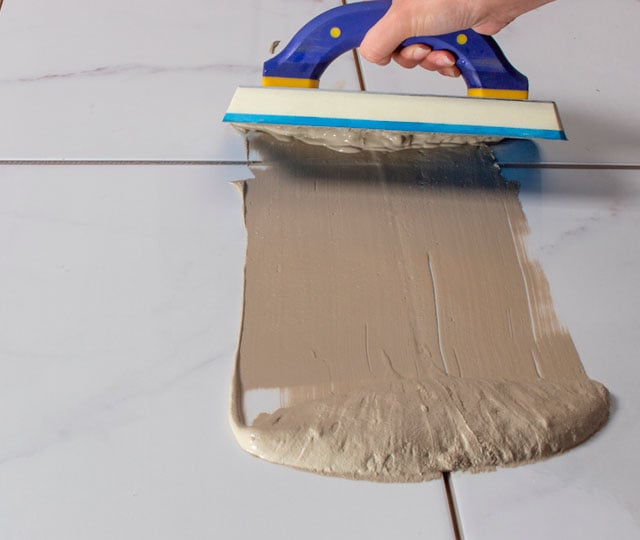
- Spread the grout over the entire surface of the tiles using a grout applicator. Make sure the grout completely fills the joints.
- Use the applicator to remove the excess grout.
- Let the grout dry for a few minutes (or according to the manufacturer’s instructions), then use a slightly damp sponge to remove any grout residue from the tile surface. Wipe the tile surface in a circular motion until no residue remains. If needed, go over it again with a soft cloth to finish.
- If needed, apply grout sealer. If your grout sealer doesn’t come with an applicator, you can use a small brush. Clean up any excess quickly. Allow the proper drying time indicated by the manufacturer.
- Reinstall doors and mouldings.
Ready to choose your ceramic tiles? Browse our online selection of floor and wall tiles. Need more help? Get advice from one of our in-store experts.
En savoir plus sur le plancher stratifié

Installer son plancher flottant en vidéo
Notre expert BMR vous montre, étape par étape, comment procéder à l'installation de votre nouveau plancher flottant.
Choisir son plancher stratifié
Parcourez notre guide d'achat pour tout savoir sur le plancher flottant et faire le bon choix.
Entretenir son plancher stratifié
Découvrez nos conseils d'entretien pour prolonger la durée de vie de votre parquet stratifié.
Shop by category
The information in this article is intended as a guide only and may not be applicable in certain situations. When in doubt, talk to a local BMR expert.